Posts

Latest updates...

 Greetings! Happy Autumn everyone!  I know I haven't posted here in ages... I have been so busy with back to school and general life!  I will be posting again soon, including multiple updates on minimum two projects. I just wanted to let you know that I am still here! :) Kindest regards, The Miniature Studio

Introducing Eminence

Image
Greetings, This marks the end of May June project, the purple overdress. I am going to give each of my projects a name, so this is Eminence. The Miniature Studio

Latest news and other ideas...

Image
Greetings! At the moment I am not sewing per say, just having a 'break'. The time I have spent away from sewing, I decided to do some drawing, designing up my next projects! On the left is the design for the Over Dress project I recently finished. It was the first design concept, and the dress came out pretty similar, which I was quite happy with.  On the right is a design concept for a possible upcoming project. It has ruffles, which I have never done before! Honestly, I may never do it but it was quite nice to draw. Other projects I would love to do: - A rebellion outfit, kind of like Delores from Westworld - A warrior outfit kind of like the ones seen in Merlin (BBC series one) - A VAD nurse outfit from WW2 - And many more! Thank you for reading and any suggestions would be taken happily! Until next time, The Miniature Studio

The Crinoline: One Day Make

Image
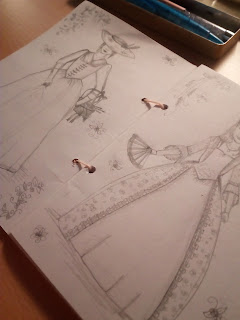
Greetings! Today, I will be making the infamous Crinoline. This is a 'cage' that was first patented in the late 1850s and was widely popular - literally! The hoops underneath made the skirt wider and kept its shape. It was flexible but strong. Here is how my attempt went... Firstly, using a standard 2 litre bottle, I measured and cut out 6mm strips to create the hoops. I thought that this would be appropriate, it is lightweight and flexible. After this, I realised that I needed a plan so I quickly sketched this out, feel free to use it if you ever do recreate this! (...and my mistake, pointed out by a fellow historical enthusiast, dia which is short for diameter, is meant to be circumference, whoops!) Next I cut strips of fabric, this was to cover the plastic to make it all uniform.  Dont worry about them freying, we cab hem them! Thats what I did, I then wrapped each circle of plastic and stitched in place. Think of it like wrapping presents, make sure it is neat and tidy, but...

Final Stretch!

Image
Greetings! I am so close to finishing this project. Below are some photos of a doll fully dressed with the Over Skirt on! And I am really happy with the way this has turned out! That final stretch is almost done, with the finishing touches left to do, which is sorting out all the loose threads poking out from the 5mm seams, the front closure method* and if I am feeling particularly courageous, lining to the front of the skirt to neaten things up! Apart from that, I call this project finished... *I have tried a few methods of corset style closures, but none are satisfactory. I do want to do a corset style closure, but I will have to keep fiddling around with it for a while. Over Skirt Project May - June 2020

Hemming and hemming...

Image
Greetings! I know its been a while since my last post, however I am back!! And today I will show you that perseverance pays off, after 3 hours of hemming and pleating, the skirt is finally on! First, I cut out the basic shape of the skirt... Then, after a lot of fiddling and measuring, I lightly tacked together the pleats on the top of the skirt, so that the width of the skirt top fitted and matched the bodice bottom length. Next, I stitched that together with the bottom of the bodice. This part was particularly fiddly, so if for whatever reason you want to recreate it, take care and go slowly! Lastly, hem the around of the skirt, making sure all the stitches are neat. I decided to do mine in white, to add a little detail. Now its really taking shape! (Its raken ages but its worth it) Yours, The Miniature Studio

Hot under the collar...

Image
Greetings! Tonights update: the collar! I finally neatened up the traditional square collar and made sure it was hemmed from back to front. Can I just point out that even this took several attempts; I first started by using white thread, which could be seen. Secondly hemmed it inside out! After many embarrassing mistakes, and several hours later, we achieved this... (I know that the stitches are unneat and not tidy but in the early hours of the morning they were the best I could do!!) Yours, The Miniature Studio